
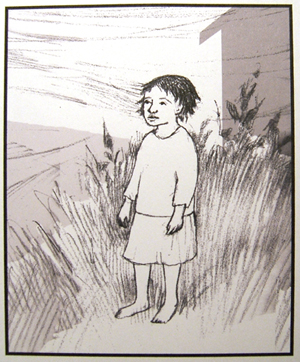
Here is the original sketch I am working with. I make sure to print out the most recent version, since they often change during the course of creating a book dummy.
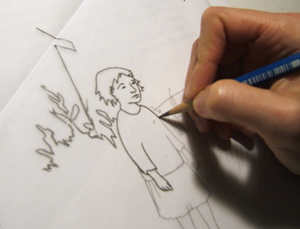
First I need to transfer this sketch to paper so I can paint it. Different artists do this different ways, but here is my method. I start by covering my sketch with tracing paper, then trace it lightly in pencil.
Next I flip the tracing paper over and trace the back side of the original tracing using a soft dark pencil, like a 4B, which smudges and transfers easily.
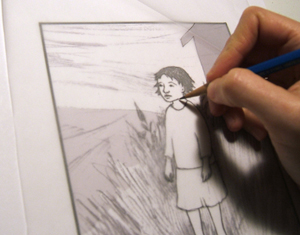
Then I get out the paper I'm going to paint on (in this case a heavy bristol board), flip the tracing paper over again and trace the image a third time. Here I used a hard pencil, like an HB, so I can get a good impression on the paper.

When I remove the tracing paper, I'm left with a faint outline of my sketch, which I then refine a little in pencil, enough so I can make out the general shapes.

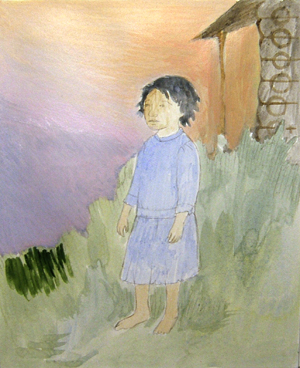
Now the painting begins. First I lay in soft washes, so that I know generally what colors I will use for different parts of the painting.

Slowly I work up the color. Often I lay down one very dark shade (here the dark green grass) so that I can see what my darkest value will be. This gives me perspective on the dark/light relationships as I continue to work.
Stay tuned til next week, I'll post the rest of my progression on this painting!
17 comments:
Anna,
What medium are you using? Acrylic? Watercolor?
Do you have a color palette worked out in your head or is it intuitive?
Are you working same size?
Love this posting....
KT
Hi Katherine,
I'm using acrylic. My other books have been in watercolor, but I've decided to make the switch and exercise my painting muscles more!
The color palette usually evolves... I often borrow from other artists (for instance Linda paints great water and skies, I have one of her books cracked open while I work on this painting- more on that next week). In general I know more or less which colors will be used a lot in a particular book, sometimes I work that out by doing a sample piece at the beginning.
Yes, working same size. Sometimes I go a little bigger than actual size, but here I don't want to loose any detail.
This is fascinating, Anna. I love seeing how other artists approach their work! I look forward to seeing how you proceed from here...
Anna,
Thank you for your time in sharing your process of painting. What a great idea for a children's workshop or school visit!
annie donwerth chikamatsu
Yay, Anna! I'm one of the ones who asked. Thanks heaps. Looking forward to more. I will try to be patient.
Jen
Annie-
Yes, I do something very similar when I do school visits... break down the process for kids, and sometimes adult groups too! I love talking about process...
"Print out the most recent version"? Do you draw it on the computer?
This post is fascinating. I can't wait to read next week's!
I found this fascinating--I didn't know you copied your sketch 3 times--so if you include the first sketch, you're actually drawing it 4 times!
I'd like to know how the other illustrators transfer their sketches--I always knew tracing paper was involved, but never understood exactly how it was done.
Libby- My original sketch I scan into the computer, adjust in Photoshop, then drop into a layout in Adobe Indesign. I then print out this layout to make my book dummy (maybe I will make a post about making book dummies...)
Alvina- Yup, you end up drawing the same image this way a whole bunch! I actually like that aspect of it, gives you time to think about how you're going to paint the image. Some artists project the sketch onto paper with an overhead projector or something similar, and trace it that way, that takes less time I think. I'd be curious to hear about other ways too!
I got tired of sketching and resketching to transfer my illos., so now, I take my sketches to a blueprint shop. They make a very light transfer to Canson paper. Works well for paint, but maybe not so well for water color, though they will transfer to watercolor paper. Comes to about $3.00 per page, total.
Like Don, I also got tired of sketching and re-sketching. By the time I have a completed dummy, I've drawn the same images enough to (hopefully) know what I want from the finished illustration. Therefore, I don't trace the image, but draw directly on the paper and cross my fingers (not at the same time). I do this not only because I'm tired of sketching, but because I'm often surprised by what comes out, and surprise makes me happy. Unfortunately, this process has about a 50% success rate, which isn't entirely conducive to meeting deadlines...I'll have to work on that.
Jeff
p.s. Anna, I like the painting already! Do you (or does anyone else) ever find that you're happier with an in-progress piece, rather than a finished illustration?
Jeff-
Wow, drawing directly on the paper, thats impressive! I usually end up changing the drawing quite a bit once I've transferred it, but I always feel like I need to get all the proportions in place with a transfer. Or maybe its just another form of procrastination!
I know what you mean, sometimes I finish a painting and think it looked much better hours ago. Finding that point when I'm happy with it and it looks finished enough is tricky.
ps I LOVE Hippo No Rhino! Tres Magnifique!
Great fun seeing how you work Anna and hearing how others work too! Very timely topic for me. I just went out and invested (yeah, it’s an investment) in a large format printer to “transfer” my initial drawing onto to my final art paper. This method could work in a lot of different ways, especially for you Anna since your working it up in Photoshop anyway.
In my case, I do my final sketch as a full value study in Graphite. Scan it, make adjustments, and then print it out directly onto Stonehenge paper. I use that as a grisaille or underpainting for my color pencil final. I work in a pretty tight, realistic style, so this saves me a ton of time. I can work faster in graphite, make changes more easily, and I don’t have to transfer! Similar to how the old masters worked, I them layer my color on top of the underpainting. You wouldn’t have to do a full value study, it could be an outline drawing.
Both Epson and HP make printers that can handle heavy stock and use water-resistant ink. You’d have to check out the ink for your use. For me it works great, but I’m applying color pencil. This is a pretty new technique for me. So far I’m very pleased with the results. I do have a sample step-by-step of images on my website if you want to take a look. It’s under “Fun Stuff”. The first three steps show the graphite value study, the last three show the print-out with color pencil being applied.
I'm looking forward to seeing your next set of images! Oh, and I know what you mean about knowing when to stop. Isn't it weird how we don't really know when a piece is finished?
gail
www.gailmakiwilson.com
Thanks Anna! Good luck with the piece!
Post a Comment